Contributing
-
It is worth reminding that our entire documentation is a constant work in progress.
-
For development tasks, when starting every project it is best to go through the main features and considering whether we need to implement any improvements into the template that could be used in future apps, so we keep adding to our pool of available resources.
-
Similarly, if you have any suggestions on how to improve our Notion docs, please let us know! Let's write down great documentation together :)
Setup
git clone https://github.com/codeleap-uk/internal-libs-monorepocd internal-libs-monorepo# Pulls git submodules for templatesgit submodule update --init --recursive# Install dependenciesyarn# Builds local versions of librariesyarn build# To build the app for android. Substitute android for 'ios' to run on apple devicesyarn mobile android# To quickly open the templates .xcworkspace in Xcodeyarn mobile xcode# To run the mobile templateyarn mobile dev# To run the web templateyarn web dev# To preview the docs websiteyarn docs dev
Webpack's watch functionality only tracks changes to the built version of @codeleap/common, so you will have to run
yarn buildagain after making changes to packages/common
Coding time
We have a few packages published
- @codeleap/common - Things that are going to be used everywhere
- @codeleap/cli - Helpful commands for development
- @codeleap/mobile - Components, hooks and utilities for use with react-native
- @codeleap/web - Components, hooks and utilities for developing websites
- @codeleap/config - Our common configuration for eslint
The source code for these packages resides at the packages/ folder in the root of this repository.
Where should I add my code?
Here's the simple answer:
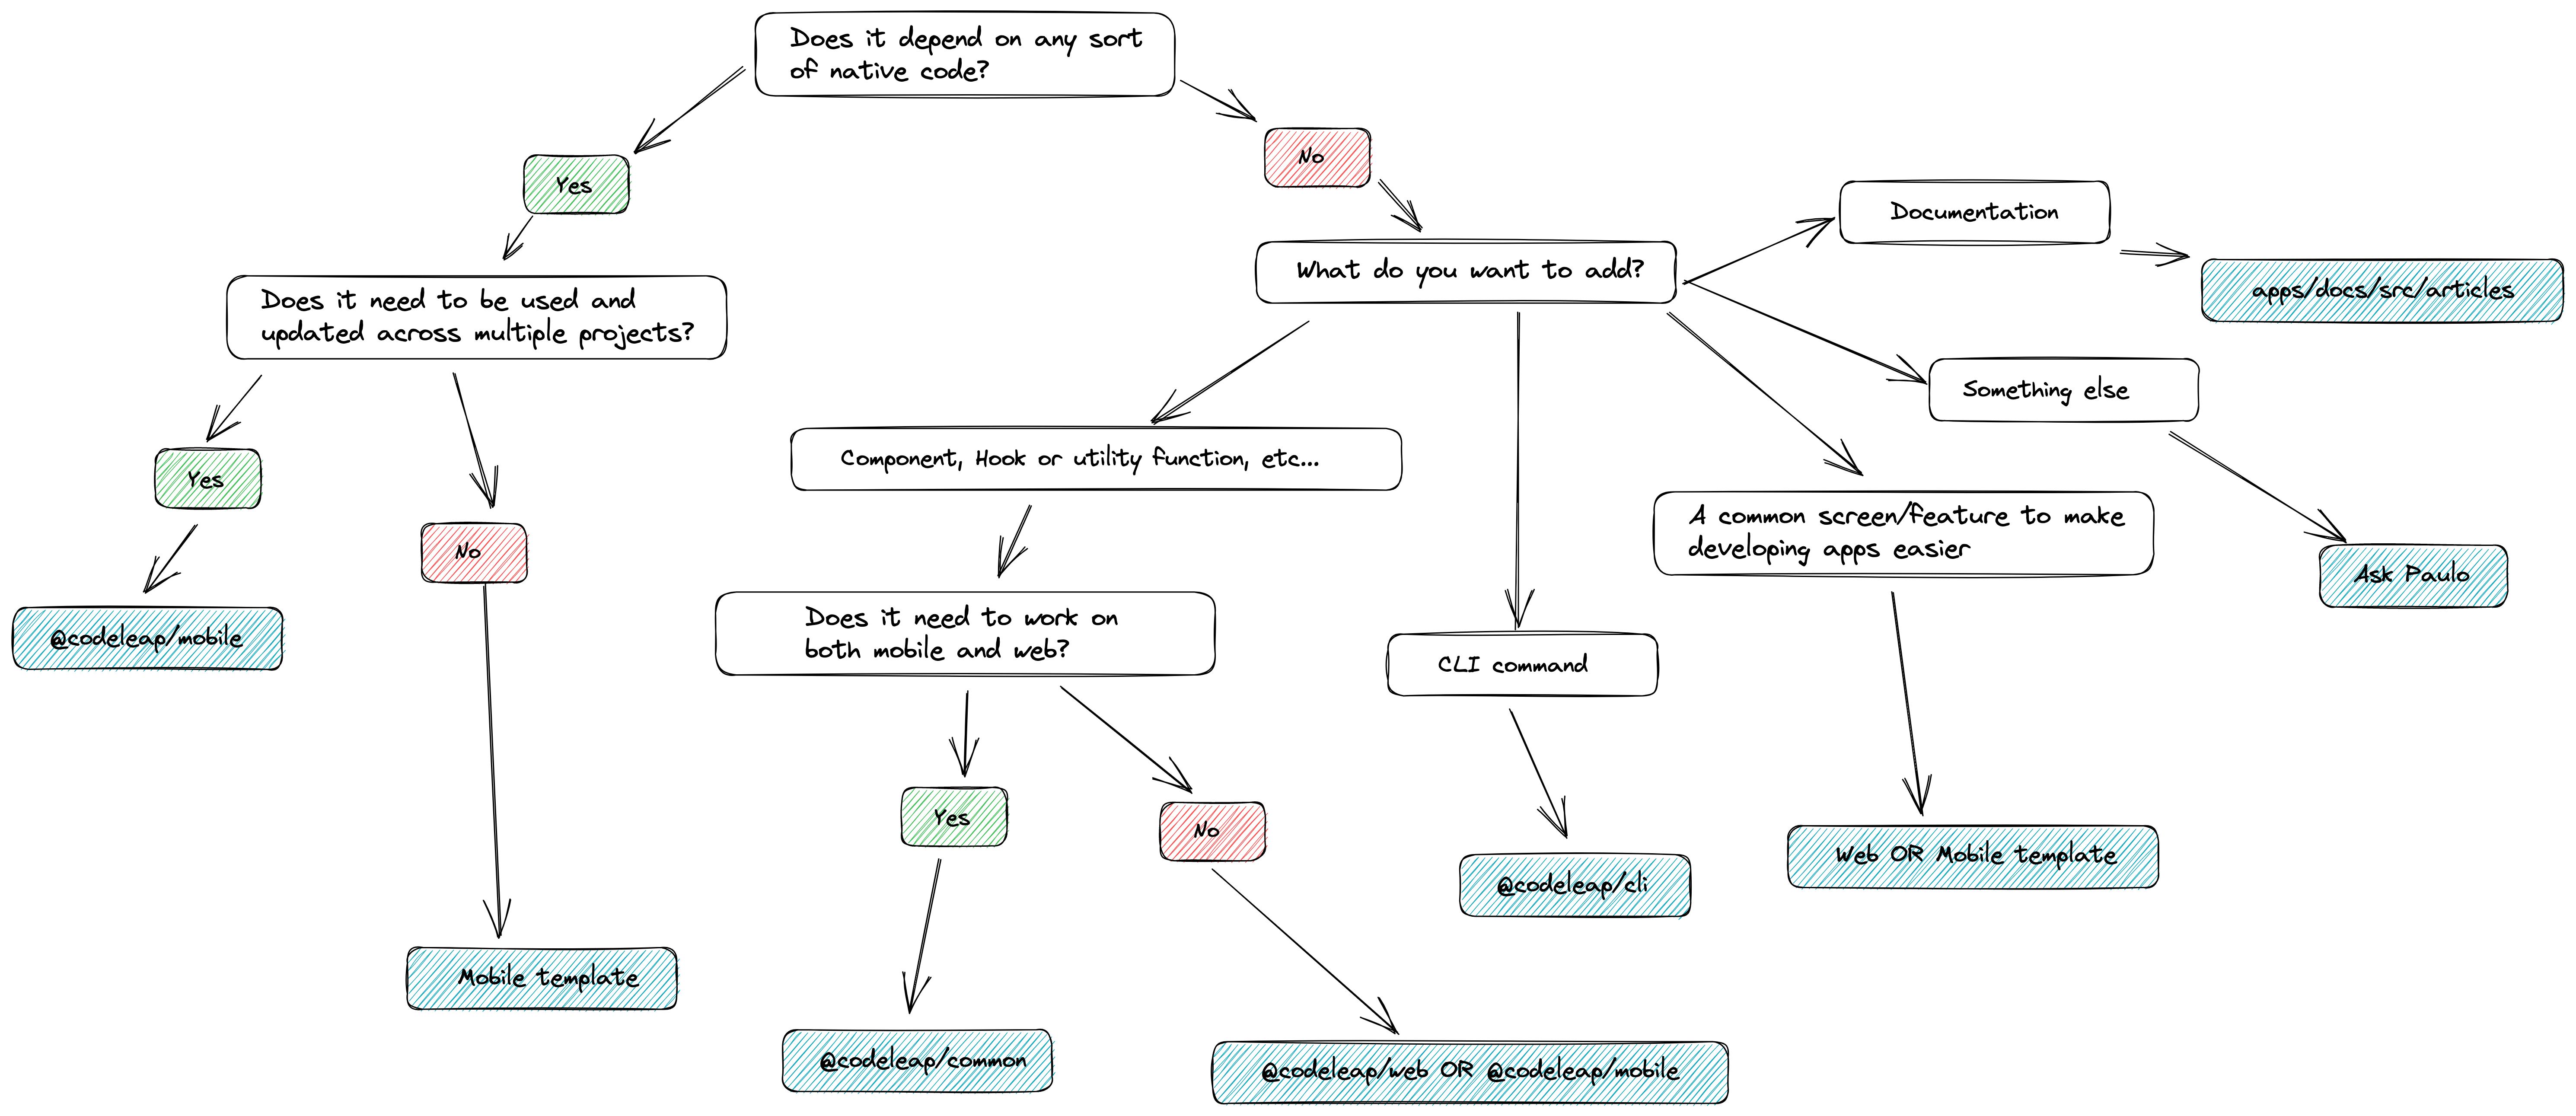
Where to add your code
Just like everything in software development, the answer is actually "It depends", but the chart above should help with most cases.
Regarding dependencies
Since this is a monorepo, it relies heavily on symlinks and package deduplication. However, that doesn't really work too well with react-native, as, put simply, lots of native code relies on libraries being in the node_modules just beside the app's package.json and cannot resolve symlinks, which is a problem because the packages we install are added to the node_modules at the root of the repository.
To solve this issue, we use yarn workspaces's nohoist option, to prevent select packages from residing in the top level node_modules and instead being copied to the one of it's dependant.
With a bit of adjustment to metro's configuration, we are able to run react-native in monorepos.
For @codeleap/mobile, whenever native code is needed, the dependency name should be added to packages/mobile/package.json inside peerDependencies, and the actual installation is done in the template. With this, the library can get the dependency at runtime without any conflicts.
Do not add dependencies with native code to any package.json save for the mobile template's. The only exception is the aforementioned peerDependencies inside packages/mobile/package.json
To add typing to libraries that are only peerDependencies, you may try adding @types/library-name as a devDependency to packages/mobile/package.json. If a types-only package exists, it should work
Adding things to the template app or website
Inside apps/, are the following folders
- mobile: a git submodule pointing to
mobile-template. We clone this when starting a new project - web: a git submodule pointing to
web-template. We clone this when starting a new project - docs: Not a submodule, just a website created from the web template which holds the lines of text you are currently reading.
If you haven't heard of git submodules, here's an overview
If you are wondering why use submodules at all, here are a few reasons:
1.Once a new project is started, we may simply pull commits from the templates as needed without involving changes to the monorepo
2.Cloning is easier since we don't need to worry about extracting a nested folder from the parent repo
3.Review is easier, changes to the package's API are always separate from changes to the app's themselves
4.We can have as many templates as we want, for different use cases, while still testing them with the latest packages
5.If you add a feature to the package's, creating a branch inside a submodule is a great way to showcase it's use without bloating the examples
When commiting files inside of apps/mobile or apps/web, you are actually commiting to their respective repositories. The parent repository internal-libs-monorepo will merely hold a reference to the commit you just created.
Writing/patching documentation
Clone the internal-libs-monorepo repository and navigate to apps/docs/src/articles, the folder which contains all of the documentation pages, in the .mdx format.
If you are not familiar with MDX, read more about it here.
The structure of this folder is as follows:
- Module
- Category
- ...articles
- ...articles without category
- order.json (file used for determining order of articles on navbar and automatically assigning previous and next buttons at their end)
- Category
Where:
- Module is one of: mobile, common, web, cli or "concepts", which is a category of it's own dedicated to holding documentation about our culture, procedures, and overarching technical concepts
- Category is the subgroup of articles inside the documentation of a module, so for a component library, you could have
componentsandhookscategories to separate content. If a category is not specified (the .mdx file is at the root of the module's folder), it's simply placed at the root in the navbar.
The order.json file at the root of each module has the following structure:
[{"name": "root","items": ["index","typescript"]},{"name": "workflow","items": ["contributing","pr-template","management"]},{"name": "styling","items": ["fundamentals","theme"]}]
The example above produces the following output
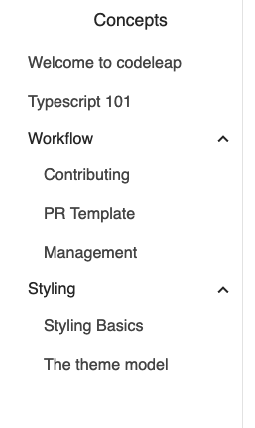
Order output
For each of these objects, name can be either root or the name of the folder in which the mdx file resides. If name is root, links to articles are placed on the top level of the navbar without a dropdown ("Welcome to Codeleap" and "Typescript 101" in the example above).
items is an array of the filenames inside the folder (or beside the order file if name is root), which dictates their order of exhibition.
Keep in mind that the title displayed in the navbar is determined inside the mdx file itself
So, in summary, just determine where what you wish to write should go based on the existing folder structure, and where in the order of articles it should be placed, then start writing.
About styling
If you feel the need to change styles of some part of the documentation apps/docs/src/components/mdxTransforms.tsx is your file. Each markdown tag maps directly to one of the html tags defined in the file. You may use any React features inside the functions assigned to these html tags.
Guidelines for writing documentation
- Order articles so that they can be read sequentially while improving upon the understanding of previous articles.
- When you reference some other part of the documentation, add a link to make navigation easier. Relative paths are supported. If you reference an external resource, add a link as well.
- Add nice titles to what you write.
- Include examples when talking about code, it makes everything easier.
- If you wish to add information that is not vital to the content of the article itself, use
blockquotes. They will be styled according to their types (Annotated directly at the start).- To add a blockquote to the article, use the following syntax:
> NOTE this is a note> WARNING You've been warned> TIP It's a great idea, I'm telling you> INFO You really should knnow this